Tuesday, September 08, 2015

Physics: Force & Motion + Gravity + Isaac Newton (Block 1)

Our school days ran overly long last week (our first week of third grade). It's apparent that I'm going to have to drastically restructure our history plans and go back to a rotating block schedule for it and science. I can't figure any other way to work it. That means history will have to take a back seat to science for a while.

This is the fourth and final year of our first time around the history-science cycle we follow. I talked about the four-year cycle method way back when we started Ancient History. Here's a refresher as to the ordering.

Ancient History < > Life Science (First, Fifth, Ninth Grades)
Middle Ages < > Earth Science & Astronomy (Second, Sixth, Tenth Grades)
Early Modern < > Chemistry (Third, Seventh, Eleventh Grades)
Modern & Today < > Physics (Fourth, Eight, Twelfth Grades)

We're a year ahead, so that means Modern History and Physics are up for us this year. Luckily, physical science is common in the early grades, so materials were a good bit easier to come by than when we studied chemistry last year. However, creative, quality output options I found lacking.

We will primarily be using BrainPOP, BrainPOP Jr., Bill Nye the Science Guy DVDs, various science themed books by Nomad Press, and a couple of supplements from Teachers Pay Teachers in our study of physics this year.

Brain POP
 Explore Gravity!: With 25 Great Projects


Force & Motion - Day 1

Force & Motion - Day 2


Gravity - Day 1

Gravity pulls everything down toward the center of the earth. Tessa proved which way is straight down by creating plumb bobs with pencils, yarn and various objects around the school room. Her favorite bob had a plastic frog tied to it.

Gravity - Day 2

Gravity - Day 3

Tessa and I created and tested a water level that we made out of clear plastic tubing, a funnel and colored water. Tessa learned that when water is in a confined space, gravity makes sure the top of it is level. Pretty cool!

Gravity - Day 4

Tessa fashioned a mobile from straws, paperclips and pictures drawn on card stock to better understand the relationship between gravity and balance. The theme for her mobile was our recent trip to Florida. It features pictures of the beach, a view of our condo at night from the pool, a pizza (doughnut on the opposite side), and a triple-scoop ice cream cone.

Gravity - Day 5

Gravity - Day 6

Tessa swung a ball in a cup to see centripetal force in action. No matter how she swung it, the ball never fell out.

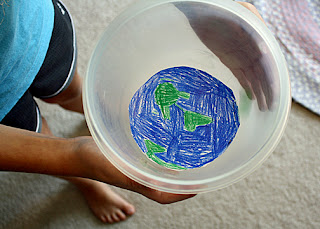
Tessa created a mock Earth orbit with a drawing of the Earth taped into the bottom of a plastic bowl and a marble "moon" (the "moon" is the green blur on the right-hand side). She moved the bowl in a circular motion to experiment with centripetal and centrifugal force.

Gravity - Day 7

Gravity - Day 8

Gravity - Day 9

Tessa played "Set the Bottle" to see how some carnival games use gravity to make it harder to win. I filled three bottles half full of water and then placed them in the freezer the day before so that one bottle froze upside down, one on its side and the third upright.

Isaac Newton - Day 10

Wednesday, September 02, 2015

Brownie Quest - Connect Key

It's Your World - Change It!: A Leadership Journey
Girl Scout Brownies

I've had several inquiries over the past months regarding how we completed the rest of our Brownie Quest Journey last year. I know it seems like we just kind of fell off the face of the earth. In reality, I overextended myself. Regretfully, the only thing I could responsibly drop to give myself a little breathing room was updating our blog. I'm going to do my best to rewind and provide an abbreviated version of what we did in a series of posts these next couple of weeks.

To recap...Brownie Quest - Discover Key.

Meeting 2

Meeting 3

Quick Note: Although I don't plan to detail it, we did fill in the Brownie Quest Map as we progressed through our Journey. The girls delighted in guessing the names of the keys.


Brownie Quest - Connect Key

To find the Connect Key, Brownies connect as a Brownie Team, with their families on a healthy-living activity, and with their communities to increase healthy-living opportunities.

Brownie Quest Connect Key

Meeting 4
I printed the rules and story I read to the girls from Toobeez.com. I couldn't find my tablecloth, so we used an old beach towel for the sinking ship. The girls had an absolute blast with this and requested to play it a second time. I used information from the Brownie Quest How To Guide (page 60) to both preface and then discuss connecting as a team after the game.

  • Created the Brownie Team Agreement.
I felt the Brownie Team Agreement as presented in the How To Guide was rather dull. I knew it was not going to impress our very active troop of eight-and-nine-year-olds. Thank goodness I ran across a pic of Mrs. Ricca's Kindergarten class promise bulletin board on Pinterest. Feel free to give it a "like," as this display totally transformed our Brownie Team Agreement into something creative and fun. The girls expressively enjoyed signing their agreement with custom paper-crafted self portraits.

After coloring and attaching lines of their Brownie Team Agreement to a piece of tag board, our girls paper-crafted self portraits to "sign" the agreement.

I used information from the Brownie Quest How To Guide (page 61) to type out, print and cut apart the lines to the team agreement ahead of time. (I recommend printing them on white cardstock.) During our troop meeting, I guided the girls in coming up with similar lines by using the answers they gave to the questions from our previous "Connecting as a Team" (page 60) discussion. I jotted down most all of their ideas on a dry erase board and then asked which ones would be the best to include in their team agreement. As the girls answered one at a time, I handed the corresponding pre-cut lines to them to color (we used colored pencils) any way they wanted. In other words, the girl who said, "helping each other" got the "to help each other," line to color.

After coloring and attaching the text with double-sided re-positional tape (to later be glued on permanently by the troop leader at home) for the Brownie Team Agreement to a piece of over-sized colored tag board, I handed out paper-crafting kits that I prepared ahead of time for the girls to make self portraits. I also displayed a sample of myself as a Brownie, so they could understand the idea. Each kit contained an appropriately colored skin tone circle for the head, a dark brown semicircle for the beanie, a slender dark brown rectangle for the beanie tab, a white Brownie elf emblem to be colored by the girl, one heart shape, and one star shape. Cardstock works best for all components. They shared scissors, glue sticks and colored pencils from community school boxes. The heart and the star were to represent the ever popular Girl Scout SWAP. Each girl was supposed to pick just one to write her name on and then attach it to her portrait's beanie at the end with a staple (to represent a safety pin), but some girls used the leftover shapes as barrettes. (An adult may wish to help with the stapling. My girls were exuberant staplers, which jammed the device. After the third time, I took over to prevent tears from damaged projects.) I had a short stack of quarter sheets of paper in various natural colors for them to choose from for their hair. Again, I had the girls use re-positional double-sided tape to affix their portraits to the team agreement. I detached and returned their portraits when I handed out end-of-the-year badges.

  • Learned to prepare two healthy snack recipes to connect with their families on a healthy-living activity at home.
It was nearing Christmas when our troop met to complete this step of the Journey, so I thought making Grinch-themed fruit kebabs with Strawberry Yogurt Fruit Dip (just two ingredients) would make this activity all the more festive. I demonstrated how to make the dip and then the girls made several kebabs to pass out to their parents and the other girls in our multi-level troop as a snack. I also sent home copies of the recipes for the Brownies to add to the family recipe books they made as part of the My Family Story badge. Learning how to make these healthy recipes and preparing them for their family members fulfilled the second part of the Connect Key. Making the kebabs for the other girls in the troop fulfilled Step 4 of the Snacks badge.

Meeting 5
  • Created "Circle Map: Creating Circles of Caring" from the Brownie Quest How To Guide (pages 66-67) more or less as suggested. I drew the concentric circles on a sheet of over-sized newsprint ahead of time. The girls took turns labeling the circles as we progressed through our discussion.
  • Passed out and then read aloud "The Case of the Broken Sidewalk" from the Brownie Quest girls' book. Discussed the corresponding questions from the Brownie Quest How To Guide (page 68). We also discussed what improvements could be made to better the city of Green Falls (How To Guide, page 64 and/or girls' book, page 61).
  • Crafted concentric circle bookmarks from circles that I pre-punched from heavy decorative cardstock (leftovers from a personal scrapbook project), colored craft sticks and glue (in the form of glue sticks).
  • Passed out Caring About Your Community slips to be completed at home and returned the next meeting. - The final part of earning the Brownie Quest Connect Key!

Tessa reluctantly posed with the concentric circle bookmarks she crafted during our "circle map" troop meeting.