Showing posts with label Atelier Art - Level 1. Show all posts

Friday, February 07, 2014

Medieval Times, Lesson 27

Africa

One week a month, I switch up our schedule to work in some extra fun electives that we don't have time to study on a weekly basis. This month, I got lucky and was able to work it where history, literature and art aligned. All three subjects focused on Africa.


Monday

Tuesday

Thursday

Thursday - Literature

Friday - Art

Tessa used a heavy duty oval paper plate, wrapping and tissue paper, yarn, feathers and a variety of other craft supplies to create an "African" mask during Atelier art time.

* HO = History Odyssey

Atelier Art, Level 1 - Module B, Lesson 5

Masks

"Masks" is a cultural appreciation lesson. Tessa used liquid starch (actually, Modge Podge...we didn't have any liquid starch on hand) to decoupage tissue paper, wrapping paper and other elements onto a heavy duty oval paper plate. She cut fringe and curled paper (both of which are required techniques for this lesson), added accessories and tied on yarn for hair.

Tessa thought creating her own "African" mask was really cool and had all kinds of ideas of how to use it to scare people. (Too much Scooby Doo, I think.) She didn't do real well decoupaging...she kept missing the edges, but enjoyed making fringe and adding all of the accessories.

Even though I prepared the eye holes, nose, etc. ahead of time, this project ran a bit long. Tessa was ready to be done by the end. I looked at the time stamps on my photos and it took seventy minutes from the time she cut the fringe to the time she added glitter on the cheeks. Add in everything else and I'd say it took about two hours total. A lot of the work was kind of tedious for her.

After decoupaging pieces of tissue and wrapping paper onto an oval paper plate, Tessa cut fringe for the top part of her mask.

Tessa curled strips of paper she cut by wrapping them around a paint brush.

Using a newly mastered skill, Tessa tied on multi-colored yarn for hair.

Tessa raided her craft kit for cool accessories to add to her mask. She came up with the idea of using a feather for the mouth. As a final touch, she used red glitter to color the cheeks.

Tessa's completed mask, which she absolutely adores.

Saturday, December 07, 2013

Atelier Art, Level 1 - Module B, Lesson 4

Starry Night

"Starry Night" is an artist appreciation lesson based on Vincent van Gogh's infamous Starry Night. Tessa created her interpretation by drawing with oil pastels onto blue poster board. She also cut and glued shapes from various pieces of colored cardstock for the trees and houses.

Tessa really connected with this lesson and seemed to enjoy it more than other recent lessons. She loves using oil pastels. Later in the week, she created another version of Starry Night on her own. Heck, I even got into this one and created a mini version that I hung next to our school table.

Vincent van Gogh's "Starry Night"

Using a picture of van Gogh's "Starry Night" as a guide, Tessa drew the majority of her interpretation with oil pastels.

Tessa cut and glued shapes for the trees and houses from colored cardstock. Afterward, she finished up with oil pastels.

Tessa's completed rendition of "Starry Night." She really had a lot of fun with this one. I think it may be one of her favorites.

Later in the week, Tessa created another version of "Starry Night" with oil pastels and construction paper on her own time. She hung it with poster putty in the hallway, which apparently now is an art gallery.

Inspiration struck as Tessa worked on her original "Starry Night," so I snatched a scrap from the trashcan and went to work. I hung my mini masterpiece, which is only a couple of inches tall, next to the school table. It makes me happy when I look at it for some reason.

Sunday, November 17, 2013

Atelier Art, Level 1 - Module B, Lesson 5

Zoo Animals

I had a hard time coming up with a large sheet of dark blue paper for Lesson 4, so we skipped forward to Lesson 5. We'll go back to Lesson 4 another time.

"Zoo Animals" is another lesson on media. Tessa primarily used glue and chalk to create a fairly unique piece of art. She learned to draw with glue and "color" by smoothing and blending chalk with her fingers.

This lesson must be completed over two days since it requires a full 24 hours for glue to dry.

After selecting a plastic antelope as a model, Tessa first sketched her design onto warm-up paper and then a sheet of black poster board.

Next, Tessa traced her sketch with school glue. We typically use glue sticks for our art projects, so she found this more challenging than we both expected.

After the glue dried and left an embossing of Tessa's antelope sketch, she "colored" in her design by rubbing and blending chalk with her fingers. She really enjoyed this part of the project.

Tessa completed zoo animal! She was very pleased with her final product. She thought it a neat project.

Sunday, October 13, 2013

Atelier Art, Level 1 - Module B, Lesson 3

The Four Seasons

Last school year, I had planned on studying art twice a month. As it turned out, art became one of those subjects that didn't get done (often enough, anyway). This year, I have a more realistic plan...once a month, make time for it no matter what. That should give us just about enough time to finish up Atelier Art, Level 1.

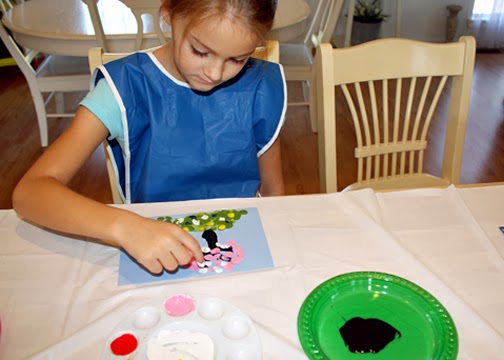
"The Four Seasons" is a lesson on media. Tessa used red, yellow, blue, white and black tempera to finger paint mini scenes of the four seasons. She learned to mix colors to make orange, green and pink as well.

This lesson can be completed all at once or over several days or the year. Since we really don't have time to spread it out, we chose to complete it all at once. The first two seasons went really well, but Tessa began to lose focus by the third season. I pretty much had to direct her every step by the time we got to the last season. It wasn't that she wasn't enjoying the process of painting, more that she was rushing and not thinking through the steps. Having said that, I think we ended up with a really cute final product.

Tessa finger painted a fall scene with pumpkins and a ghost. She learned to mix red and yellow to make orange for the pumpkins, and blue and yellow to make green for the stems and grass.

Tessa used a dull pencil loaded with paint to "draw" in the smaller details of her winter scene.

Tessa mixed red and white paint that she used to dot pink flower blossoms onto a spring tree.

Tessa's completed "The Four Seasons" project. I used an inexpensive piece of black poster board cut down to size and a tape runner to mount her scenes.

Saturday, June 15, 2013

Atelier Art, Level 1 - Module B, Lesson 2

The Queen of Hearts

No matter how hard I tried, I just couldn't get behind this lesson. It plagued me for quite a while before finally deciding to give it up and move on. My apologies to anyone hoping to see Tessa's completed work for this lesson.

Friday, March 22, 2013

Atelier Art, Level 1 - Module B, Lesson 1

The Cat in the Hat

Has it really been two months since we've done art?!! It sure doesn't feel like it...science and history keep us feeling plenty crafty.

"The Cat in the Hat" is a lesson on drawing. Tessa used a black marker to outline The Cat in the Hat and then shaded him in with MetKids 24 Crayon Brights, which feel a lot like oil pastels. The lesson called for crayons, markers or oil pastels.

This lesson was a bit tricky due to the large size of the 12" x 24" sheet of white paper that was required. A child-sized art table would have come in handy, as Tessa had a hard time getting into a good drawing position. She kept trying to draw smaller than instructed (note The Cat's teeny tie) and her lines tended to tilt, so we had to talk through each step beforehand. She still made a few mistakes, but I helped her figure out how to patch them up. Overall, not our best art day, but we got through it.

Using plush The Cat in the Hat dolls as guides, Tessa first outlined her Cat.

Then, she shaded him in with black and red crayons.

Tessa's completed The Cat in the Hat.

Saturday, January 26, 2013

Atelier Art, Level 1 - Module A, Lesson 6

My Family

This was the final lesson of Module A. I'm not exactly sure what this means other than that we are now one-third of the way through Level 1. I feel a small sense of accomplishment, as we kind of got off to a slow start with Atelier.

"My Family" is a lesson on media...the end goal is to use various forms of media to create a family portrait. It is divided into two parts to allow drying time for part one. During part one, Tessa used halved potatoes and tempera paint to create face prints for the members of her family. For part two, she used a black marker to draw in facial features and body parts. Then, she colored in those parts with oil pastels.

Of course, the use of paint and the possibility of smearing the oil pastels, set me on edge a bit. Aside from a few drawing mistakes that we had to figure out how to fix up a bit, the lesson went quite well and didn't take nearly as long as I expected...probably due to the small size of our family more than anything else. I had a hard time deciding what brand of oil pastels to buy for this project. In the end, I chose Crayola due to price, positive reviews on Amazon and color selection. I hadn't used oil pastels in a very long time, but I didn't feel like they glided across the page as smoothly as I thought they should have. They didn't feel soft enough...they felt a little too much like regular ole crayons to me. And, I thought the end result should have been a little more striking, but maybe it was just the way Tessa colored everything in. She has a tendency to rush when coloring.

After mixing up a suitable skin tone, Tessa painted halved potatoes.

Next, she stamped a potato print face for each member of our family.
Next, she stamped a potato print face for each member of our family. 

The following day, Tessa drew in facial features...

...and body parts. She thought about how to layer each family member as she drew.

Finally, Tessa colored in her portrait with oil pastels.

Tessa's completed family portrait!

Friday, January 18, 2013

Atelier Art, Level 1 - Module A, Lesson 5

Two Cats and a Dog

"Two Cats and a Dog" is a lesson on shape. It reviews line and introduces the concept of overlap as well. Out of the Atelier lessons so far, this one was the most challenging for Tessa. She has a hard time looking at an object or drawing and duplicating it with accuracy. Cutting out the dog gave her a few fits as well. We probably need to brush up on her cutting skills. If we had it to do over again, I would probably have her use a glue stick instead of school glue. I forgot how wavy school glue can leave paper after it dries.

Tessa began by drawing a cat shape and then filling it with different types of lines.

After drawing two cats and a dog, Tessa cut them all out.

Following the teacher on the DVD's instructions, Tessa arranged and then glued her critters so that they overlapped in two places. For the finishing touch, she pasted a red fabric bandanna onto the dog's neck.
Following the teacher on the DVD's instructions, Tessa arranged and then glued her critters so that they overlapped in two places. For the finishing touch, she pasted a red fabric bandanna onto the dog's neck.

Friday, December 14, 2012

Atelier Art, Level 1 - Module A, Lesson 4

Clowns

We're still loving Atelier Art! My original goal for art was every other week (or at least twice a month). I think we've fallen off that schedule a bit, as history and science have been absorbing so much time lately. I really need to get us back on track. Tessa always enjoys art day.

"Clowns" is a lesson on pattern. I was afraid it might be a little complex and slightly daunting for Tessa. There's so much drawing and coloring to be done, but she remained focused and resolved. We were rewarded with a really cute piece of artwork.

After viewing several photos of various types of clowns and a little guidance from the Atelier Art teacher, Tessa set to work on her clown.

Tessa enjoyed using bold contrasting colors to create many different types of pattern.

Tessa's completed clown is a happy fellow! I especially like his rainbow hair.

Saturday, December 08, 2012

Atelier Art, Level 1 - Module A, Lesson 3

Animal Textures

This quick and easy lesson on texture seemed more like a craft than true art, but it did the trick. Tessa now knows and understands the word "texture." It was a fun little project...one that we both enjoyed.

Tessa first chose a piece of glittery stiffened felt from a stack of differently textured fabrics. It reminded her of Speedy, a box turtle that we housed once for a local turtle race. After adding a head and legs cut from card stock, she drew shapes on its shell.
Tessa first chose a piece of glittery stiffened felt from a stack of differently textured fabrics. It reminded her of Speedy, a box turtle that we housed once for a local turtle race. After adding a head and legs cut from card stock, she drew shapes on its shell. 

Tessa enjoyed creating her textured turtle so much that she asked to make a second animal. A fluffy piece of purple fleece made her think of a sheep.

Friday, November 02, 2012

Atelier Art, Level 1 - Module A, Lesson 2

Picasso Hands and Flowers

Although this was only our second time using Atelier Art, I have been quite impressed at how well Tessa listens to the instructor on the DVD. She follows her instructions and movements way better than she does mine. I'm always tense when an art project involves paint...more so when my laptop is sitting a mere two feet from the paint and water bucket. After we got past Tessa tracing her hands (I had to help her a bit...Tessa tracing with her left hand just wasn't happening) and I realized that hey, she's doing a pretty good job, my tension eased considerably. I was able to take some pics. By the end, I was actually enjoying myself watching her paint.

"Picasso Hands and Flowers" is a lesson on color. It teaches that there are three primary colors and that those colors may be mixed to make secondary colors. The lesson also introduces renowned painter Pablo Picasso and features his painting Mains Aux Fleurs. Since Picasso is the key artist for this module, I'm considering using this lesson as a jumping off point for a quick artist study.

Tessa carefully mixed yellow with red to make orange, blue with red to make violet, and yellow with blue to make green.

After tracing her hands and then painting the middles of the flowers, Tessa used her freshly mixed green paint to paint stems.

Tessa painted the last of her petals orange.

Although not instructed to do so during the instructional portion of the DVD, the children featured on the DVD embellish their traced hands. Tessa wanted to embellish hers too. This would have been much easier before painting, but she made it work.
Although not instructed to do so during the instructional portion of the DVD, the children featured on the DVD embellish their traced hands. Tessa wanted to embellish hers too. This would have been much easier before painting, but she made it work. 

Friday, October 05, 2012

Atelier Art, Level 1 - Module A, Lesson 1

Caterpillar

This was our first ever lesson using Atelier Art. It is our most extravagant curriculum purchase to date, so I was a wee bit nervous. I'm happy to report success!

Atelier Art is a DVD-based art curriculum originally designed for schools without quality art programs. Something Tessa and I especially like about Atelier is that it shows several children Tessa's age completing the projects in a school setting. It shows realistic examples of student work as well.

Today's techniques involved the use of various types of line. The project, a caterpillar.

Tessa carefully watched the instructor and students model each technique before trying them out for herself. This part was a warm-up exercise completed on scrap paper.

After drawing the head and body, Tessa drew straight, jagged and curvy lines onto her caterpillar.

Tessa got extra creative and used a variety of line techniques in this segment of her caterpillar.
Tessa got extra creative and used a variety of line techniques within this segment of her caterpillar. 

Lots and lots of lines!

Tessa put the finishing touches on her caterpillar.

Tessa couldn't have been prouder of her artwork. I'm proud too. She did a great job!

Monday, July 16, 2012

Atelier Art, Level 1 - Supply List

So glad I decided to type this out. What a list! Luckily, I think we already have most of the required items. I hope to collect the rest during the current back-to-school sales.

I had been toying with the idea of adding additional drawing curriculum, but now that I have taken a little closer look at Atelier's lessons, I think it should be mooooorrrre than enough art for Tessa this coming year. She'll have plenty of opportunities for crafts, hands-on 
activities and experiments during history and science as well.

---------------


Module A


Lesson
1 - Caterpillar: Line - Warm-up paper, 12" x 18" white paper, and fine-point black drawing pens.

Lesson 2 - Picasso Hands and Flowers: Color -
 Warm-up paper, paper plates, tempera paints (red, yellow, blue), brushes, sponges, water in cans, 12" x 18" white paper, black marking pens, and a bouquet of flowers.

Lesson 3 - Animal Textures: Texture -
12" x 18" colored paper, different textured fabrics cut into oval shapes, rectangles of colored construction paper (white, black, yellow, brown), scissors, glue, and black marking pens.

Lesson 4 - Clowns: Pattern -
 Motivational: Clown figures, small statues, clown pictures, and samples of patterned fabrics. Lesson: Warm-up paper, 12" x 18" white paper, fine-tipped black marking pens, and colored marking pens.

Lesson 5 - Two Cats and a Dog: Shape -
12" x 18" white paper, 8-1/2" x 11" white paper, colored construction paper (one brown piece per student for the dog and a selection of colors for the cats), red-and-white fabric with a print for the dog's bandanna (cut into triangles before the lesson), scissors, and glue.

Lesson 6 - My Family: Media -
Part 1: Potatoes (a variety of sizes cut in half lengthwise), tempera paints (brown, peach), brushes, sponges, water in containers, and 12" x 18" white paper. Part 2: The potato prints from Part 1 and oil crayons.


Module B


Lesson 1 - The Cat in the Hat: Drawing -
12" x 24" drawing paper (cut an 18" x 24" paper by 2/3). Drawing: Fine-tipped black marking pens. Coloring: Oil crayons, and crayons or marking pens.

Lesson 2 - The Queen of Hearts: Drawing -
 Motivational: Costumes for acting out The Queen of Hearts. You will need a costume for the Queen, the King and the Knave. Put felt hearts on the costumes. Create a plate of tarts out of paper or use real ones. Other: A book of nursery rhymes, practice paper, pencil, colored marking pens, and an action strip. This is a 6" x 18" piece of paper that has been folded in half twice to make creases that mark off four equal sections of the strip.

Lesson 3 - The Four Seasons: Media -
Tempera paints (red, yellow, blue, white, black), pencils, 12" x 18" black paper, colored construction paper measuring 5-1/2" x 8" (royal blue, light blue, yellow, black), paper plates (one for black tempera paint to be shared by a group of students, and one with red, yellow, blue and white for each individual student), a damp sponge and folded paper towel for each student, and white glue. If you choose to do each season as a separate lesson, use 9" x 12" paper.

Lesson 4 - Starry Night: Artist Appreciation -
 Warm-up paper, 12" x 18" royal blue or dark blue paper, small scraps of colored construction paper (violet, black, light blue), 6" x 9" black paper (one per student), oil crayons, scissors, and glue. A reproduction of Van Gogh's Starry Night.

Lesson 5 - Zoo Animals: Media -
 Part 1: 12" x 18" black paper, a pencil or yellow chalk, white glue (must be clog-free), plastic and/or wooden models of zoo animals. Part 2: The finished and dried zoo animal drawings from Part 1, colored chalk in flat containers, damp sponges for fingertips, plastic and/or wooden models of zoo animals.

Lesson 6 - Masks: Cultural Appreciation -
 Preparation: A single-hole punch, and heavy oval-shaped paper plates. Other: White glue, liquid starch in flat containers, brushes, a collection of material for decorating masks (wrapping paper, colored tissue, colored construction paper, heavy yarn, ribbons, colored pipe cleaners, feathers, etc.). Optional: 1/4" dowels (8" to 12" long) may be pushed through a hole by the chin and taped onto the back of the mask. This provides a way for students to hold the masks up to their faces.


Module C


Lesson 1 - Butterfly and Cocoon: Media -
 Part 1: 12" x 18" white paper, 6" x 9" white paper folded in half with half of a butterfly drawn on it, 4" x 5" white paper (2 per student), scratch paper, paper plates, tempera paints (red, yellow and blue on one plate for each student, and brown on a separate plate for students to share), water in cans, sponges in containers, brushes, scissors, white glue, English cucumber sliced into 1" pieces, and black marking pens (optional). Motivational: The book, The Very Hungry Caterpillar by Eric Carle. Part 2: Completed leafy paintings for background, butterfly print, cocoon print, caterpillar print, scissors, paste or glue, and black marking pens.

Lesson 2 - Old King Cole: Drawing -
 Part 1: 12" x 18" white paper, medium-sized potatoes cut in half lengthwise, skin-toned tempera paints, brushes, sponge, and water. Part 2: Fine-tipped black marking pens, oil crayons or colored marking pens, and the dry potato print.

Lesson 3 - Little Bear in a Big Chair: Drawing -
 Motivational: Teddy bears of all sizes in chairs of all sizes, and the book, Where's My Teddy? by Jez Alborough. Other: Warm-up paper, 12" x 18" white paper, fine-tipped black marking pens, colored chalk, liquid starch in flat containers, and damp sponges for fingertips.

Lesson 4 - The Happy Little House: Self-Expression -
 Warm-up paper, 18" x 24" white paper (spring, summer, autumn), 18" x 24" light blue paper (winter), tempera paints (red, yellow, blue, white, black), paper plates, sponges in containers, and brushes.

Lesson 5 - Georgia O'Keeffe: Artist Appreciation -
Fresh flowers (one per student), 12" x 12" white paper, watercolor pans, crayons, water, brushes, and sponges.

Lesson 6 - Do You Like My Hat?: Media -
 Part 1: Medium-sized brown paper bags, brightly colored tempera paints on a paper plate, brushes, sponges, and water. Part 2: Ribbon, yarn, fringe, tassels, feathers, rickrack, silk flowers, fancy pipe cleaners, and white glue. Motivational: The book, Go, Dog, Go! by P. D. Eastman.